Harris Aerial Support

Flight Performance

Flight Behavior

Flight Log Analysis

For in-depth flight analysis such as: flight balance, abnormal flight characteristics/behavior, or general inquiries regarding performance please download your flight logs using one of the steps below and send them to support@harrisaerial.com.


There are two methods for obtaining flight logs, these include: Analyze Tools from the HA menu icon or using an SD card reader to pull directly from the SD card located on the side of Cube autopilot.


Analyze Tools

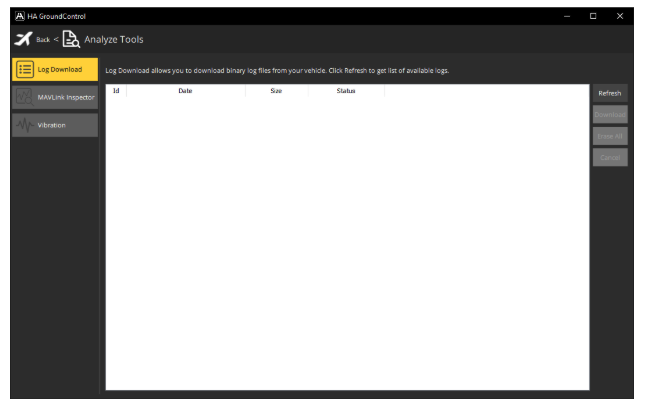
Click on the HA logo, and open Analyze Tools from the popup menu. The first tab Log Download is used to list (Refresh), download, and erase all log files from the connected vehicle.


SD Card

Remove the avionics cover plate using a 2.5mm driver. The SD card should be located on the drone left side of the Cube autopilot. Press the SD card with a finger to release it, and pull the SD card out. Using an SD card reader, logs may be downloaded directly to a computer.

Flight Behavior

Arming & Disarming

  • Ensure that all pre-flight checks are completed. This includes verifying the battery level, checking the integrity of the propellers, and ensuring that all components are securely attached.
  • Confirm that the GPS signal is strong and that the flight control system is functioning correctly.
  • Open the flight control software on your Ground Control Station (GCS).
  • Navigate to the arming section in the software.

Follow the specific steps outlined in the software to arm the drone. This typically involves a combination of switches or commands

  • Ensure the drone is placed on a flat surface.
  • Engage the arming switch/button on the GCS.
  • The drone’s LEDs may change color to indicate it is armed.


Confirm that the drone is armed by checking the software status and LED indicators on the drone.

  • Double-check the area around the drone to ensure it is clear of people, animals, and obstacles.
  • Announce loudly that the drone is armed to alert those nearby.

Flight behavior

Disarming The Drone

  • After completing the flight, ensure the drone lands safely on a flat and stable surface.
  • Use the flight control software to bring the drone to a complete stop.

Follow the specific steps outlined in the software to disarm the drone:

  • Disengage the arming switch/button on the GCS.
  • The drone’s LEDs may change color to indicate it is disarmed.


Confirm that the drone is disarmed by checking the software status and LED indicators on the drone.

  • Perform a quick inspection to ensure there are no damages or loose parts.
  • Power off the drone and all related equipment.
  • Store the drone in a safe place.

Flight Behavior

Takeoff Parameters

  • Open the mission planning software on your Ground Control Station (GCS).
  • Navigate to the takeoff parameters section in the software.
  • Familiarize yourself with the various views:
  • Input the desired takeoff altitude in the mission planning software. This is the height the drone will ascend to immediately after takeoff.
  • Ensure the altitude is high enough to clear any immediate obstacles but not so high as to interfere with other air traffic or operations.
  • Define the initial flight path the drone will follow after takeoff. This should be a clear, straight path to avoid any nearby obstacles.
  • Ensure the path is free from buildings, trees, power lines, and other potential hazards.
  • Physically inspect the takeoff area to ensure it is free from obstacles and debris.
  • Confirm that there are no people, animals, or moving objects in the vicinity that could interfere with the takeoff.
  • During the drone’s initial ascent, closely monitor its path and behavior using the GCS.
  • Be prepared to take manual control if the drone deviates from the planned path or encounters an unexpected obstacle.

Contact Information

Drop us a line here and we will get back to you within 24 hours.

Flight Performance

Tips & Guidance

H6E

Flight Times:

Typical flight duration with different payloads:

  • Light payload: Up to 45 minutes.
  • Heavy payload: Around 30 minutes.

EFI

Fuel Efficiency Metrics:

Fuel consumption rates based on payload and flight time:

  • Typical efficiency: 1.5L per 45 minutes.

Hydrogen Flight Efficiency:

Flight duration based on hydrogen tank size:

  • Light payload: Up to 2 hours.
  • Heavy payload: Up to 90 minutes.

H6HL

With Payload:

  • Light Payload (≤10 kg): Up to 45 minutes.
  • Maximum Payload (40 kg): Around 15-20 minutes, depending on environmental conditions.

Without Payload:

  • Up to 65 minutes under ideal conditions.

H8E

With Payload:

  • Light Payload (≤3 kg): Up to 50 minutes.
  • Maximum Payload (6 kg): Around 35 minutes.

Without Payload:

  • Up to 60 minutes, depending on wind conditions and flight patterns.

Environmental Considerations:

Flight times can vary with weather, altitude, and pilot settings.

Maximum Recommended Wind Speed:

  • 25 mph sustained winds.
  • Drones have performed optimally up to 35 mph gusting, but this is not recommended due to the risk involved.

Contact Information

Drop us a line here and we will get back to you within 24 hours.

Calibration

Getting Started

  • Location: Place the drone in an open area, away from any metal objects or large structures that could interfere with the compass readings.
  • Environment: Ensure the calibration area is free from electromagnetic interference, which could affect the compass accuracy.
    ——-
  1. Compass Calibration:
    Use Mission Planner’s compass calibration tool:

Steps:

  1. Connect the drone to the GCS using telemetry or USB.
  2. Go to the Initial Setup tab in Mission Planner.
  3. Select Compass Calibration and follow the on-screen instructions.
  4. Rotate the drone in all directions as indicated (pitch, yaw, and roll).
  5. Save the calibration.

     2. IMU Calibration:
         Use Mission Planner’s accelerometer calibration tool:

 Steps:

  1. Place the drone on a flat, level surface.
  2. In Mission Planner, navigate to Initial Setup > Accelerometer Calibration.
  3. Follow the on-screen prompts to position the drone in specific orientations (e.g., level, on its side, nose up/down).
  4. Save the calibration.


Please always reference pre-flight & post-flight checklists for system critical calibrations:

  • Location: Place the drone in an open area, away from any metal objects or large structures that could interfere with the compass readings.
  • Environment: Ensure the calibration area is free from electromagnetic interference, which could affect the compass accuracy.
    ——-
  1. Compass Calibration:
    Use Mission Planner’s compass calibration tool:

Steps:

  1. Connect the drone to the GCS using telemetry or USB.
  2. Go to the Initial Setup tab in Mission Planner.
  3. Select Compass Calibration and follow the on-screen instructions.
  4. Rotate the drone in all directions as indicated (pitch, yaw, and roll).
  5. Save the calibration.

     2. IMU Calibration:
         Use Mission Planner’s accelerometer calibration tool:

 Steps:

  1. Place the drone on a flat, level surface.
  2. In Mission Planner, navigate to Initial Setup > Accelerometer Calibration.
  3. Follow the on-screen prompts to position the drone in specific orientations (e.g., level, on its side, nose up/down).
  4. Save the calibration.


Please always reference pre-flight & post-flight checklists for system critical calibrations:

  • Location: Place the drone in an open area, away from any metal objects or large structures that could interfere with the compass readings.
  • Environment: Ensure the calibration area is free from electromagnetic interference, which could affect the compass accuracy.
    ——-
  1. Compass Calibration:
    Use Mission Planner’s compass calibration tool:

Steps:

  1. Connect the drone to the GCS using telemetry or USB.
  2. Go to the Initial Setup tab in Mission Planner.
  3. Select Compass Calibration and follow the on-screen instructions.
  4. Rotate the drone in all directions as indicated (pitch, yaw, and roll).
  5. Save the calibration.

     2. IMU Calibration:
         Use Mission Planner’s accelerometer calibration tool:

 Steps:

  1. Place the drone on a flat, level surface.
  2. In Mission Planner, navigate to Initial Setup > Accelerometer Calibration.
  3. Follow the on-screen prompts to position the drone in specific orientations (e.g., level, on its side, nose up/down).
  4. Save the calibration.


Please always reference pre-flight & post-flight checklists for system critical calibrations:

Calibration

Radio System Calibration

Please submit a ticket for detailed instructions or submit a ticket below. 

Submit A Ticket

Contact Information

Drop us a line here and we will get back to you within 24 hours.

Recommendations & Guidelines

Powering Off:

Open the Flight Control Software:

  • Launch the Ground Control Station (GCS) software on your device.
  • Navigate to the settings or parameters section.

Access RTL Settings:

  • Locate the RTL (Return-to-Launch) settings within the software.
  • Set the RTL point to either the designated home point or the nearest rally point.

Configure RTL Altitude:

  • Input the desired RTL altitude, ensuring it is high enough to clear any potential obstacles during the return journey.
  • Consider environmental factors such as buildings, trees, and terrain elevation when setting this altitude.

Save and Test:

  • Save the settings and perform a test to ensure the RTL function works correctly and that the drone can safely return to the set point at the configured altitude.

Submit A Ticket

Recommendations & Guidelines

Powering Off:

Open the Flight Control Software:

  • Launch the Ground Control Station (GCS) software on your device.
  • Navigate to the guided flight mode settings section.

Adjust Speed Settings:

  • Set the desired speed for the guided flight mode, considering the mission’s requirements and safety considerations.

Adjust Altitude Settings:

  • Configure the altitude settings for the guided mode, ensuring the drone maintains a safe and consistent altitude throughout the flight.

Set the Flight Path:

  • Define the waypoints and flight path that the drone will follow in guided mode.
  • Ensure the path is clear of obstacles and aligns with the mission objectives.

Align with Mission Objectives:

  • Review and adjust all settings to ensure they meet the specific needs of the mission.
  • Perform a test flight to verify that the guided mode functions as expected and that the settings provide the desired performance and safety.

Submit A Ticket

Contact Information

Drop us a line here and we will get back to you within 24 hours.