Harris Aerial Support
Software Installation and Configuration
Software Troubleshooting
Out of the box setup
Installation & Setup | C-GCS
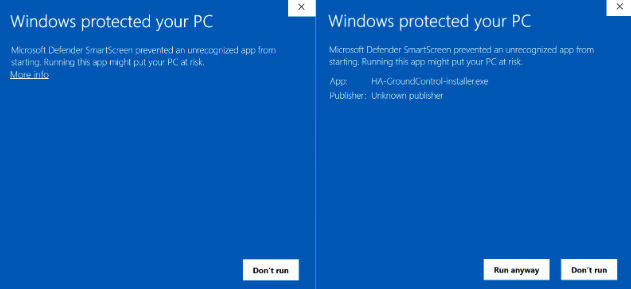
Both the C-GCS and your PC run on the same version of HAGC. Using the file named “HA-GroundControl-installer.exe” double-click the file and a Windows Defender alert may appear due to the software being an unrecognized third party application. Click on “More Info” and then select “Run Anyway”.
A window will appear asking if you want to install this application, select “Yes”. After selecting “Yes” follow the on-screen instructions, clicking “Next” and then “Install”. Once the installation has completed, there may be additional permissions. Select “Allow” for any prompts that may appear.
Installation & Setup | C-NAVIGATOR
Before installing a new version of HAGC, the previous version must be uninstalled. From the “Apps” menu on your Samsung tablet, long press the HA Ground Control application, and choose “Uninstall”. Using the file named “HA-GroundControl-64.apk”, select the application icon in your files to begin installation. You may be prompted to confirm whether or not you’d like to install this file depending on whether the device recognizes the software or not. In cases such as this, look for a “More info” indicator or “Run Anyway” and proceed with installation. Once completed accept all necessary permissions such as allowing HA Ground Control to access specific folders and systems of your device.
Installation & Setup | HereLink
Before installing a new version of HAGC, the previous version must be uninstalled. Long press the HA Ground Control application on your home screen, and choose “Remove from Favorites”. Next, select the 9-square menu at the bottom right of the screen to enter the applications menu. Long press the HA Ground Control application and select “Uninstall”. Using the file named “HA-GroundControl-Herelink.apk”, select the application icon in your files to begin installation. You may be prompted to confirm whether or not you’d like to install this file depending on whether the device recognizes the software or not. In cases such as this, look for a “More info” indicator or “Run Anyway” and proceed with installation. Once completed accept all necessary permissions such as allowing HA Ground Control to access specific folders and systems of your device.
Installation & Setup
Version Updates:
READ ME: Client Advisory
Clients should not update the system version (Microsoft updates) without consulting Harris Aerial.
- Support Check: Contact Harris Aerial support to verify if the latest operating system updates are compatible with the drone’s system.
- Needs Basis: System updates should only be performed if necessary and recommended by the support team.
Installation & Setup
Mission Planner Information
Phasing out Mission Planner
As of July 16th 2024,
Current Use:
- The main purpose of Mission Planner at this point is for telemetry and secondary system operations.
- Future Plans: Harris Aerial is moving towards HAGC (Harris Aerial Ground Control) and plans to deprecate Mission Planner software in the near future.
Submit A Ticket
Contact Information
Drop us a line here and we will get back to you within 24 hours.
- +1-850-800-9103
- support@harrisaerial.com
Software Troubleshooting
Downloads
Mandatory Update
Mandatory Update: All Harris Aerial UAS using Harris Aerial Ground Control HAGC, on all ground control stations (C-GCS, C-Navigator, C-ATLAS, Herelink) are required to update their flight control software to v2.1.0 or later. A critical bug has been discovered that could result in the total loss of your vehicle and/or payload if activated. This bug is caused by using the on-screen touch command (C-Navigator, C-ATLAS, Herelink) “Set Home Here”, where doing so while airborne causes an emergency stop that terminates the flight, resulting in a crash. Refusal to comply with the aforementioned warning or related emails sent on July 8th, 2025, may result in a voided warranty.
It is recommended to regularly check for updated flight control software as this allows access to new and updated flight and user interface features. New releases are typically announced via email or can be requested by submitting a ticket.
Before downloading and installing software, consult with your company’s IT department to determine if permissions will need to be granted to allow third-party software install. If you’re unable to access Google Drive for company security reasons, files can be obtained from a personal Google account if needed. Please submit a ticket requesting access to the “General Customer Resources” folder.
For the C-GCS, use the file named “HA-GroundControl-installer.exe”. Software can be acquired either directly through the “General Customer Resources” Google Drive folder or by downloading from a PC and using a USB drive or similar device capable of USB connection.
For the C-Navigator, use the file named “HA-GroundControl-64.apk”. Software can be acquired either directly through the “General Customer Resources” Google Drive folder via your web browser, however, the recommended option is to use either a USB type-C cable with a PC, or by using the “Quick Share” feature available on all Samsung devices. Using a “work profile” may result in IT restrictions and is not recommended.
For the Herelink, use the file named “HA-GroundControl-Herelink.apk”. Software can be acquired by downloading the appropriate file onto a PC, and transferring it to a Micro SD card.
Software Troubleshooting
Downloads: Submit A Ticket
Submit A Ticket
Contact Information
Drop us a line here and we will get back to you within 24 hours.
- +1-850-800-9103
- support@harrisaerial.com
Software Troubleshooting
Configuration & Calibration
C-GCS & PC
After installation, open HAGC and select the “HA” logo in the top left corner. Select “Application Settings” and then the “General” sidebar tab.
-HAGroundControl Setup-
When you open HAGC for the first time, you will have these prompts to follow:
- Choose to use the Metric System for measurements.
- Horizontal Distance : Meters
- Vertical Distance : Meters
- Area : Acres
- Speed : Meters/Second
- Temperature : Celsius
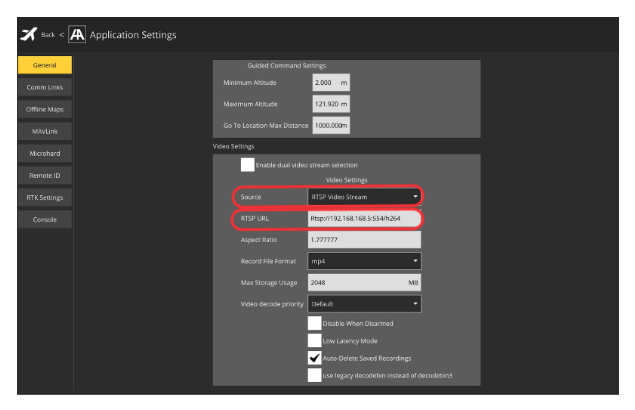
- Press the “HA” logo in the top left corner and choose “Application Settings”.
- In the “video settings” dropdown, manually enter the following information:
- Source – RTSP Video Stream
- Invid Camera – RTSP URL “Rtsp://192.168.168.5:554/h264”
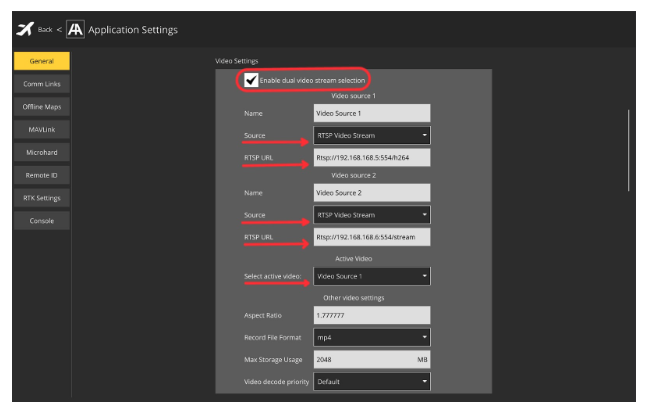
- If you are using a Picoradio (for H6E219 or Hx8062 and onward) and setting up a C-GCS with an integrated camera, like a Sony ILX with HDMI Encoder, you will need to “Enable dual video stream selection”.
If your aircraft does not use a Picoradio, ignore this step.
- Name – Video Source 1 (InVid)
- Source – RTSP Video Stream
- RTSP URL – “Rtsp://192.168.168.5:554/h264”
- Name – Video Source 2 (Sony ILX with HDMI Encoder)
- Source – RTSP Video Stream
- RTSP URL – “Rtsp://192.168.168.6:554/stream”
- Select active video – Video Source 1 (InVid)
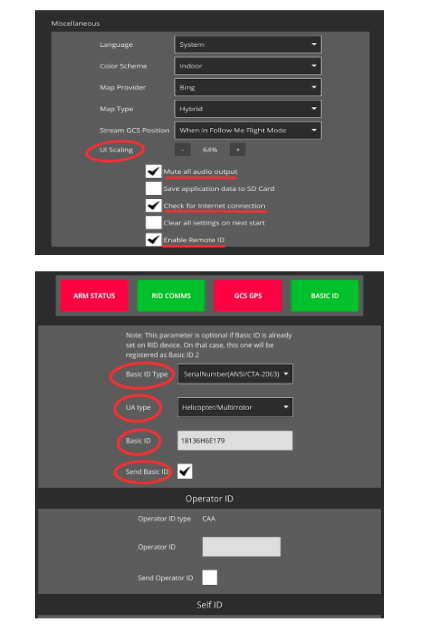
- Scroll down to the Miscellaneous portion and turn UI scaling to 97% as well as checking the boxes for
- “Mute all audio output”
- “Check for internet connection”
- “Enable Remote ID”
- Then from the left tabs, choose “Remote ID” and enter needed information.
C-NAVIGATOR
Navigator:
After installation, open HAGC and select the “HA” logo in the top left corner. Select “Application Settings” and then the “General” sidebar tab.
-HAGroundControl Setup-
When you open HAGC for the first time, you will have these prompts to follow:
- Choose to use the Metric System for measurements.
- Horizontal Distance : Meters
- Vertical Distance : Meters
- Area : Acres
- Speed : Meters/Second
- Temperature : Celsius
- Press the “HA” logo in the top left corner and choose “Application Settings”.
- In the “video settings” dropdown, manually enter the following information:
- Source – RTSP Video Stream
- Invid Camera – RTSP URL “Rtsp://192.168.168.5:554/h264”
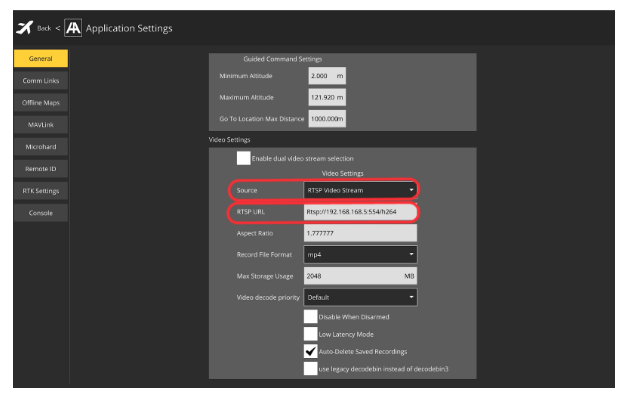
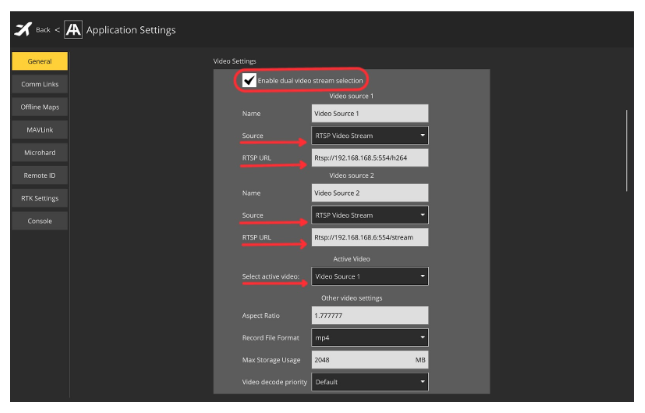
- If you are using a Picoradio (for H6E219 or Hx8062 and onward) and setting up a C-Nav with an integrated camera, like a Sony ILX with HDMI Encoder, you will need to “Enable dual video stream selection”.
If your aircraft does not use a Picoradio, ignore this step.
- Name – Video Source 1 (InVid)
- Source – RTSP Video Stream
- RTSP URL – “Rtsp://192.168.168.5:554/h264”
- Name – Video Source 2 (Sony ILX with HDMI Encoder)
- Source – RTSP Video Stream
- RTSP URL – “Rtsp://192.168.168.6:554/stream”
- Select active video – Video Source 1 (InVid)
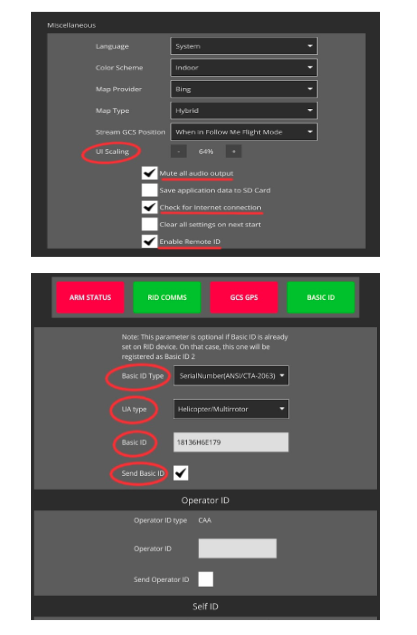
- Scroll down to the Miscellaneous portion and turn UI scaling to 64% as well as checking the boxes for
- “Mute all audio output”
- “Check for internet connection”
- “Enable Remote ID”
- Then from the left tabs, choose “Remote ID” and enter needed information
Herelink
Herelink:
After installation, open HAGC and select the “HA” logo in the top left corner. Select “Application Settings” and then the “General” sidebar tab.
-HAGroundControl Setup-
When you open HAGC for the first time, you will have these prompts to follow:
- Choose to use the Metric System for measurements.
- Horizontal Distance : Meters
- Vertical Distance : Meters
- Area : Acres
- Speed : Meters/Second
- Temperature : Celsius
- Press the “HA” logo in the top left corner and choose “Application Settings”.
- Choose to use the Metric System for measurements.
- Enter information pertaining to HDMI Herelink video setup for single and dual video feeds.
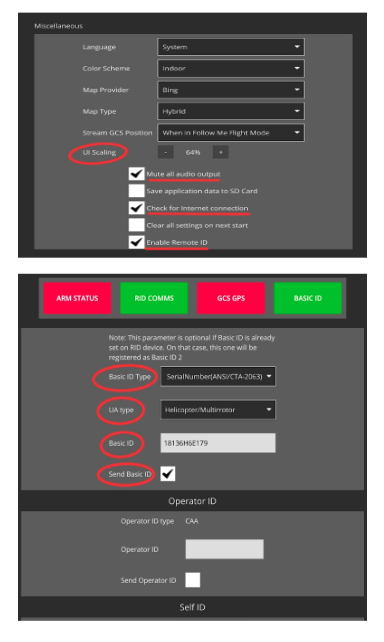
- Scroll down to the Miscellaneous portion and turn UI scaling to 64% as well as checking the boxes for
- “Mute all audio output”
- “Check for internet connection”
- “Enable Remote ID”
- Then from the left tabs, choose “Remote ID” and enter needed information.
- If you are using a Picoradio (for H6E219 or Hx8062 and onward) and setting up a C-Nav with an integrated camera, like a Sony ILX with HDMI Encoder, you will need to “Enable dual video stream selection”.
If your aircraft does not use a Picoradio, ignore this step.
- Name – Video Source 1 (InVid)
- Source – RTSP Video Stream
- RTSP URL – “Rtsp://192.168.168.5:554/h264”
- Name – Video Source 2 (Sony ILX with HDMI Encoder)
- Source – RTSP Video Stream
- RTSP URL – “Rtsp://192.168.168.6:554/stream”
- Select active video – Video Source 1 (InVid)
- Scroll down to the Miscellaneous portion and turn UI scaling to 64% as well as checking the boxes for
- “Mute all audio output”
- “Check for internet connection”
- “Enable Remote ID”
- Then from the left tabs, choose “Remote ID” and enter needed information
GARMIN With NAVIGATOR 5
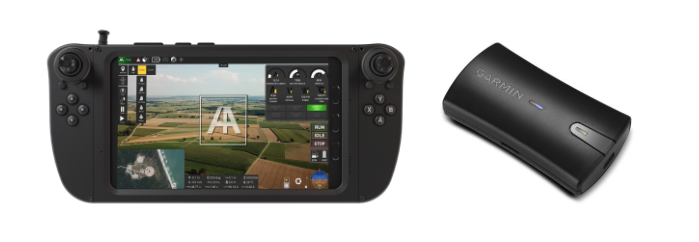
-Goal-
This document provides comprehensive instructions for the setup and usage of your Garmin Glo2 Portable GPS with your Navigator5 Handheld controller, including a walkthrough of how to use it for Remote ID (RID) purposes.
-Getting Started-
You will need to have your Navigator5 in front of you with your Garmin powered on in order to follow the steps listed below. You may need to be somewhere with a GPS signal (outside or near window) in order to see this working in real time. This link below will take you to the user manual for the Garmin GPS in case you would like to learn more about the system.
-Pairing the Garmin-
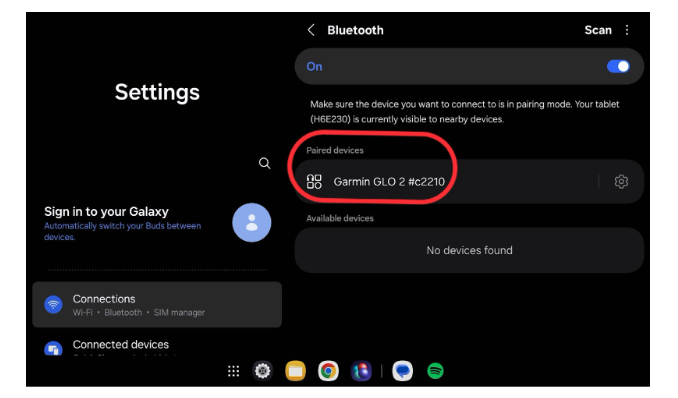
This Samsung settings page is where you will need to go in order to re-pair your Garmin with your Navigator5 if they become unpaired. For this instance, we will use this page to verify the Garmin is currently paired and operational.
-Bluetooth GNSS App-
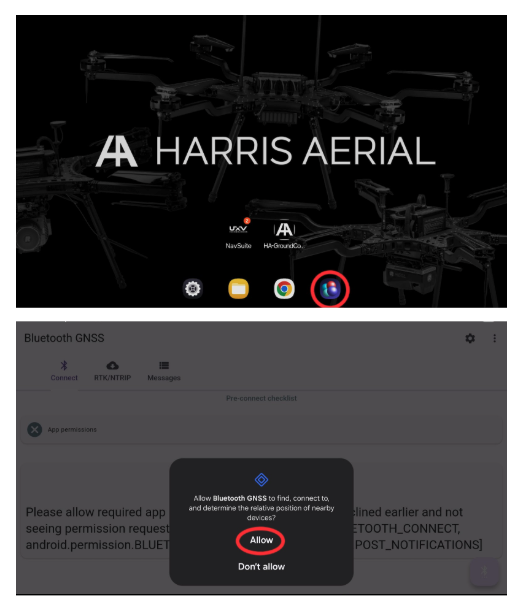
Upon launching the GNSS application, you may be prompted to grant permissions for location and nearby devices. Please approve these requests, ensuring the “app permissions” on the checklist display a blue checkmark.
Once you see that the “pre-connect checklist” in the app (indicated by blue checkmarks) is complete, you can now connect to your Garmin device using the floating button in the bottom right corner of the screen.
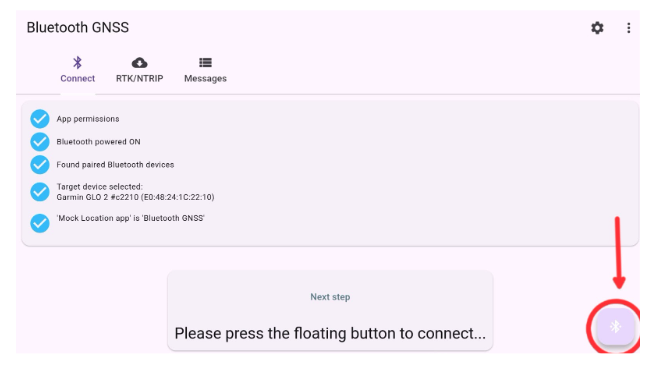
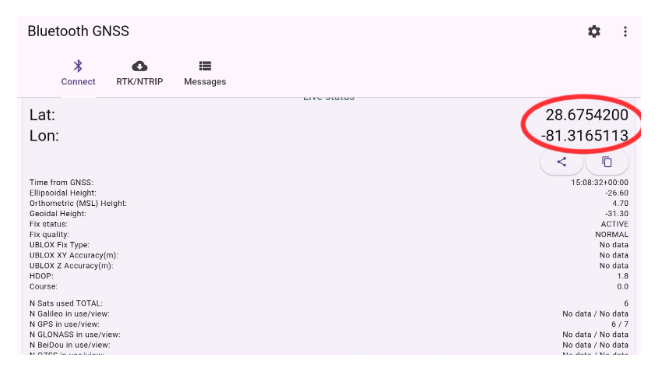
Once you are fully connected to the Garmin using the GNSS app, it will display your Lat and Lon coordinates letting you know that the Garmin is working and its GPS signal is now being shown. If you do not see a value shown here, please move your Garmin device to a better location with a stronger GPS signal.
While using the GNSS app, this is now being used as the primary GPS signal and takes precedence over the internal GPS of the Samsung Tablet.
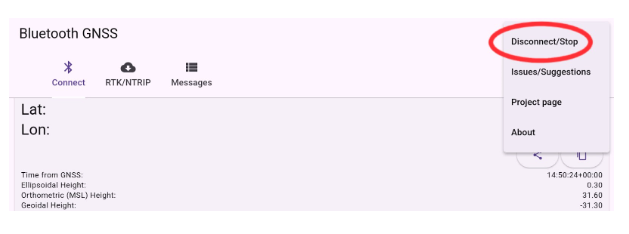
Within the GNSS app, there are a few menus to be aware of. While connected to the Garmin, you can disconnect by finding the three dots in the upper right corner of the screen and you will see “Disconnect/Stop” which will take you back to the “pre-connect checklist” page.
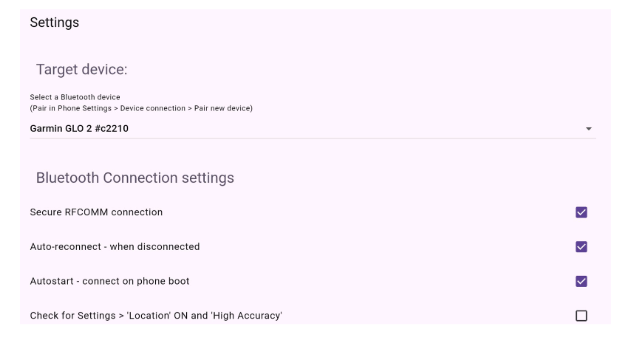
While you are disconnected from the Garmin, you can also now select the cog wheel in the upper right corner of the screen in order to access the GNSS app settings menu. From here, there are a few things you can look at to ensure you’re getting the most out of your device.
-Using with HAGC-
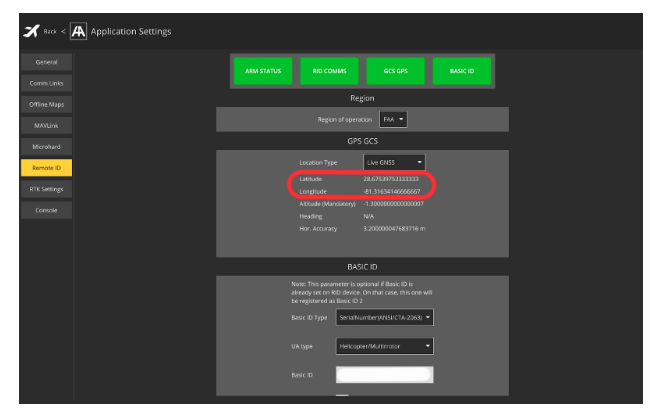
When you are connected to the Garmin Glo2, HAGC’s “Remote ID” settings now seamlessly report Latitude and Longitude directly from the GNSS app. What you see for Lat & Lon in the GNSS app is now what you’re seeing on HAGC. No additional setting adjustments are needed when opting for the Garmin; it functions as a backup choice if the Samsung Tablet’s GPS signal struggles to provide an accurate and precise operator location required for Remote ID.
Submit A Ticket
Contact Information
Drop us a line here and we will get back to you within 24 hours.
- +1-850-800-9103
- support@harrisaerial.com